
Introduction
Let’s be honest for a moment: the current state of the Front End web development ecosystem is deeply broken. I’m not the first one to say this; it’s a conversation that has been going on for at least a decade now.
The so-called JavaScript fatigue is real1. Too many frameworks, too many tools (linters, transpilers, bundlers), too many concepts (code splitting, tree shaking), and too many obscure errors (Hydration failed seriously?).
Relentless change, increasing complexity and that painstaking feeling of constantly missing out on the next big thing (“Just one more lane bro”).
If you are a Web Developer today, you already know the feeling. You want to build a simple CRUD application, but before you write a single line of code, you are drowning in the bottomless sea of tooling:
- complex configuration files for bundlers (Vite mostly solved this issue thankfully)
- transpilers that convert code you can read into code you can’t (and suddenly the #ViewSource Affordance is gone)
- state management libraries for problems you don’t have, but you think you do
- a
node_modulesfolder that weighs heavier than the Universe itself
Somewhere along the way, we collectively decided that the Single-Page Application (SPA) should be the default architecture for everything. Even simple websites. We convinced ourselves that full page reloads were detrimental to the user experience, that a server shouldn’t always return the same header and footer if they didn’t change, that a JSON API was necessary to properly decouple the systems.
Turns out that shipping a massive JavaScript payload to the client doesn’t really solve any of those issues, but instead it makes the experience far worse.
“Simple” is disparaging and “sophisticated” is high praise.
I wanted to challenge that assumption.
HTMX Records
A few months ago, while browsing the web I stumbled upon an interesting application called Astro Records, a demo of an Astro SPA built by Maxi Ferreira using Astro 3 with the experimental support for the View Transitions API and persistent islands. I was immediately intrigued. First because I’m a music fanatic, but also because it feels very snappy and fast, and the persistent player that keeps playing the music while you navigate across different pages is one of the reasons why SPAs exist in the first place.
I immediately started digging into the source code. Thankfully Maxi was kind enough to open source the application, otherwise view-source wouldn’t have helped me, since it’s all bundled and minified.
The application is fairly basic. Of course it uses Astro 3, which I’ve got to admit is an awesome framework and intelligently addresses some of my concerns above. It also uses the Signals implementation from Preact for client-side state (which track is currently playing and if the audio player is paused or not).
After tinkering with it for a while I really wanted to see if I were able to replicate this application without reaching for any JavaScript framework. No React, Vue, Svelte, etc. No JavaScript package managers. No TypeScript. No bundlers.
I wanted to see if I could achieve the same “SPA feel” using just plain HTML, CSS, and just a sprinkle of inline JavaScript, following the principle of Locality of Behavior.
I set out to build my own version of Astro Records, which unsurprisingly enough I called HTMX Records.
The Stack
To achieve this, I used a set of tools that prioritize simplicity and rely heavily on HTML attributes rather than imperative JavaScript APIs. This specific combination is sometimes referred to as the HALT Stack:
- HTMX: a library to build User Interfaces which gives you access to AJAX, CSS Transitions, WebSockets and Server Sent Events directly in HTML, using attributes.
- AlpineJS: a tiny library for composing behavior directly in the markup. For the small bits of client-side interactivity (like toggling a dropdown) that don’t require a server round-trip.
- Laravel: the most simple and robust PHP framework for the backend.
- Tailwind CSS: for styling the application directly in the markup, using utility classes.
Why this stack? You might ask.
The beauty of these tools (minus Laravel, of course) is that they share a common philosophy: they all allow you to define behavior and appearance directly in the HTML:
- With Tailwind, you don’t write a separate CSS file; you write the classes directly in the HTML elements
<span class="text-2xl font-medium text-gray-600">Hello World</span>
- With HTMX, you don’t write a
fetch()call in a separate JS file; you write
<button hx-get="/clicked">Click Me</button>
- With AlpineJS, you don’t write an event listener in a script; you write
<div x-on:click="open = true">...</div>
This reduces context switching and keeps your code remarkably simple and readable (more on this later). This characteristic is known as Locality of Behavior.
Locality is that characteristic of source code that enables a programmer to understand that source by looking at only a small portion of it
— Richard Gabriel
The application is available here and the source code is available on GitHub.
Implementation Highlights
In this section I’m going to highlight a few implementation choices.
SPA Navigation
Single-Page Applications are called that because they hijack the default routing mechanism of browsers. The navigation between pages happens dynamically instead of your browser making separate requests to the web server:
<a
  href="/page2"
  onClick={event => {
    // stop the browser from changing the URL and requesting the new document
    event.preventDefault();

    // change the relevant parts of the page

    // push an entry into the browser history stack and change the URL
    window.history.pushState({}, undefined, "/page2");
  }}
/>
Client-side routing can be great for performance, but it also comes with some potential side effects for accessibility which are usually overlooked by developers. For instance, screen readers may not announce page changes, and keyboard focus can be lost after navigation, leaving users disoriented.
Implementing a “SPA-like” navigation with HTMX is surprisingly straightforward, thanks to the hx-boost attribute. This single html attribute tells HTMX to intercept all anchor tags (a.k.a. links) and forms on the page. Instead of doing a full browser refresh, HTMX fetches the new content via AJAX and seamlessly swaps the content inside the <body> tag. If you’re familiar with Rails, this is exactly how Turbo Drive works.
The browser History API is updated automatically, so the back button still works as expected. To the end user, it feels exactly like a Single-Page app, but there is zero client-side routing code to maintain and zero changes required in your Backend code.
This feature addresses one of the first critiques of Multi-Page applications: page transitions are slow because JavaScript and CSS assets are downloaded on every page navigation.
First of all, browsers are very good at caching static assets so usually they are not downloaded again after the first request, but it’s true that those assets need to be parsed and executed in the browser on every navigation. However, in most cases this isn’t a real concern.
Another benefit of using hx-boost is that your application will keep working even with JavaScript disabled.
Notice:
In case you need to load new static assets that are present in the <head> of another page, you can use the head-support extension provided by HTMX.
hx-boost is very powerful, but it can also introduce weird bugs, as I’m going to explain later.
Animations
Browsers nowadays have extensive support for CSS animations. Originally they were available only for transitioning elements in the same document. With the introduction of the View Transition API, browsers can now animate between two documents, without needing a single line of JavaScript.
An example is a transition between a list of the albums to the album details page. You can see that the album cover is preserved and animated during navigation.
How to implement the View Transition API is out of the scope of this post. You can consult this article by Declan Chidlow which gives a very clear and extensive explanation, but in short we need to inform the browser about which elements are visually the same across the page transition and optionally which animation we want to apply.
Browsers offer two new pseudo-elements: ::view-transition-old, which handles the outgoing content, and ::view-transition-new, which handles the incoming content.
The HTML of the album list contains this CSS (scoped by album id, but it’s not relevant here)
::view-transition-old(record) {
   animation-duration: 180ms;
   animation-timing-function: cubic-bezier(0.76, 0, 0.24, 1);
   animation-fill-mode: both;
}
When navigating to a new page the browser will look for an element with the same transition identifier record and it will apply the animation.
<img src="album-cover.jpg" style="view-transition-name: record" />
The approach is obviously the same when navigating from the album details to the list of albums. The HTML of the album list contains this declaration:
::view-transition-new(record) {
   animation-duration: 180ms;
   animation-timing-function: cubic-bezier(0.76, 0, 0.24, 1);
   animation-fill-mode: both;
}
which will apply the same animation for incoming content.
Modals and Panels
When I started my career as a web developer I was fascinated by modals and sliding panels. Back in the day I always relied on the implementations provided by jQuery UI or Bootstrap, but in the end any implementation boils down to just two divs in the page, one for the modal and one for the overlay:
<body>
   <div class="overlay"></div>

   <div class="modal">
      <h2>Title</h2>

      <div>Some content</div>

      <button>Close</button>
   </div>
</body>
.overlay {
   display: none;
   position: fixed;
   inset: 0;
   background: rgba(0, 0, 0, 0.6);
   z-index: 99;
}

.modal {
   display: none;
   position: fixed;
   top: 50%;
   left: 50%;
   translate: -50% -50%;
   z-index: 100;
}

.modal.open,
.overlay.open {
   display: block;
}
Just a sprinkle of JavaScript is necessary to show and hide the modal itself (by applying or removing the open class).
A different matter if you want to make the content of the modal dynamic. I cannot count how many times I’ve used the remote attribute of Bootstrap’s modal options (before they decided to deprecate it in v3.3.0) or used the good old jQuery .load() method to fetch remote content into a modal.
With AlpineJS/HTMX the implementation of a modal window is also pretty straightforward. First of all we need a Blade component or partial for a generic modal:
<div id="modal"
    x-data="{ show: false }" x-show="show" x-init="$nextTick(() => show=true)"
    class="fixed top-0 left-0 bottom-0 right-0 z-50 flex items-center justify-center"
    x-on:close-modal="show = false; setTimeout(() => $el.remove(), 200);"
    x-on:keyup.escape.window="$dispatch('close-modal')"
>
   <div class="absolute -z-1 top-0 bottom-0 left-0 right-0 bg-black/50 backdrop-blur" @click="$dispatch('close-modal')"></div>
   <div class="mt-[10vh] w-4/5 max-w-2xl border rounded-lg shadow-lg p-5"
        x-show="show"
    >
      {!! $slot !!}
   </div>
</div>
We can use the $slot placeholder to inject content (just make sure it’s not user-generated content, as it gets inserted unescaped).
Then we can use this modal whenever we need. For instance in the app, the button to play an album or a song requires you to be authenticated. If you are logged in we can render the attributes to play the song, otherwise we can just render a modal with the login form.
@auth
   <button type="button"
      hx-get="/albums/{$album->id}/songs/{$song->id}/play"
      hx-target="#audio-player"
   >
      Play Song
   </button>
@else
   <button type="button"
      hx-get="/login"
      hx-target="body"
      hx-swap="beforeend"
   >
       Login to Play Song
   </button>
@endauth
In the latter case HTMX makes a GET request to the login endpoint and it uses the beforeend swapping strategy, which appends the content after the last child inside the body.
The controller just checks if the request is coming from HTMX. If it is it renders the modal, otherwise it renders the full login page.
if ($request->header('HX-Request')) {
   return Blade::render('components.modal', [
      'title' => 'Login',
      'slot' => view('partials.login-form'),
   ]);
}

return view('pages.auth.login');
What’s nice about this approach is that the login-form partial is the same one used in the login page. In most of the cases you don’t have to duplicate views if you’re following the same component-splitting approach popularized by React.
I haven’t focused too much on the accessibility, so one downside of this modal implementation is that elements underneath the modal overlay are still accessible using the keyboard. This means for instance that you can trigger the modal multiple times. In the future I would like to replace the current implementation with the native HTML dialog element, which is now supported in all modern browsers.
Persistent Elements
One of the biggest arguments for SPAs is the ability to keep elements (like a music player in the original demo) persistent on the screen while the user navigates across different pages. In regular MPAs navigating to a different URL effectively wipes out everything from the screen and you start with a completely new page.
In the original codebase this feature is implemented using an Astro client island, where the player is loaded only client side using the client:load directive and it’s persisted across View Transitions using the transition:persist directive.
<div id="audio-player">
   <Player client:load transition:persist="player" />
</div>
Implementing this feature with HTMX doesn’t really require much more work than that. It can be done with just 3 steps:
- First we need to add an anchor element in the pages where we want to inject the player. This can be an empty
divsince we’re not going to render it on page load.
<div id="audio-player"></div>
- We need to add the
hx-preserveattribute to it. This attribute basically tells HTMX to leave the HTML element as it is, so if the player gets loaded on one page it won’t be removed from the DOM when navigating to a different page (remember that we’re usinghx-boost).
<div id="audio-player" hx-preserve="true"></div>
- Finally we need to add an endpoint to render the Player UI and the button to make a request to that URL and attach the response to our anchor element.
<button type="button"
   hx-get="/albums/{$album->id}/songs/{$song->id}/play"
   hx-target="#audio-player"
>
   Play Album
</button>

A note about the Player UI
In the app you can actually play a single song or an entire album. Generally the UI representation of a common music player has some characteristics and restrictions:
- when playing a single song you usually don’t have a playlist, so the “previous” and “next” buttons are disabled
- when playing an album you have access to a playlist
- when playing the first song of an album the “previous” button is disabled
- when playing the last song of an album the “next” button is disabled
There are obviously exceptions of course, but let’s make things as easy as possible here.
To stay true to the HATEOAS principle and the Uniform Interface principle, those constraints can be easily encoded using resource-based URIs and Hypermedia Controls.
The URI to play a single song is /player/song/{id}/play (play might be redundant here, but I’ve added it for clarity). The Backend understands the request and renders the player without playlist and with the navigation buttons disabled.
The URI to play an entire album is /player/album/{albumId}/songs/{songId}/play where songId is the unique identifier of the first song on the album. The Backend understands the request and renders the player with the album playlist, highlights the first song, disables the “previous” button and adds a hypermedia control to play the next song.
<button type="button"
   hx-get="/albums/{$albumId}/songs/{$nextSongId}/play"
   hx-target="#audio-player"
>
   Next
</button>
No need to encode the URL client-side, no need to keep track of which song is playing, which song is next and so on. It’s all driven from Backend.
Closing the player is just one DELETE request away.
<button
   @click="if (confirm('Do you really want to close the player?')) {
     $refs.player.pause();
     playing = false;
     htmx.ajax('DELETE', '/player', { target: '#audio-player', swap: 'innerHTML' })
    }"
 >Close</button>
the Backend returns an empty response which will force HTMX to remove the player from the DOM.
A note about the Playlist UI
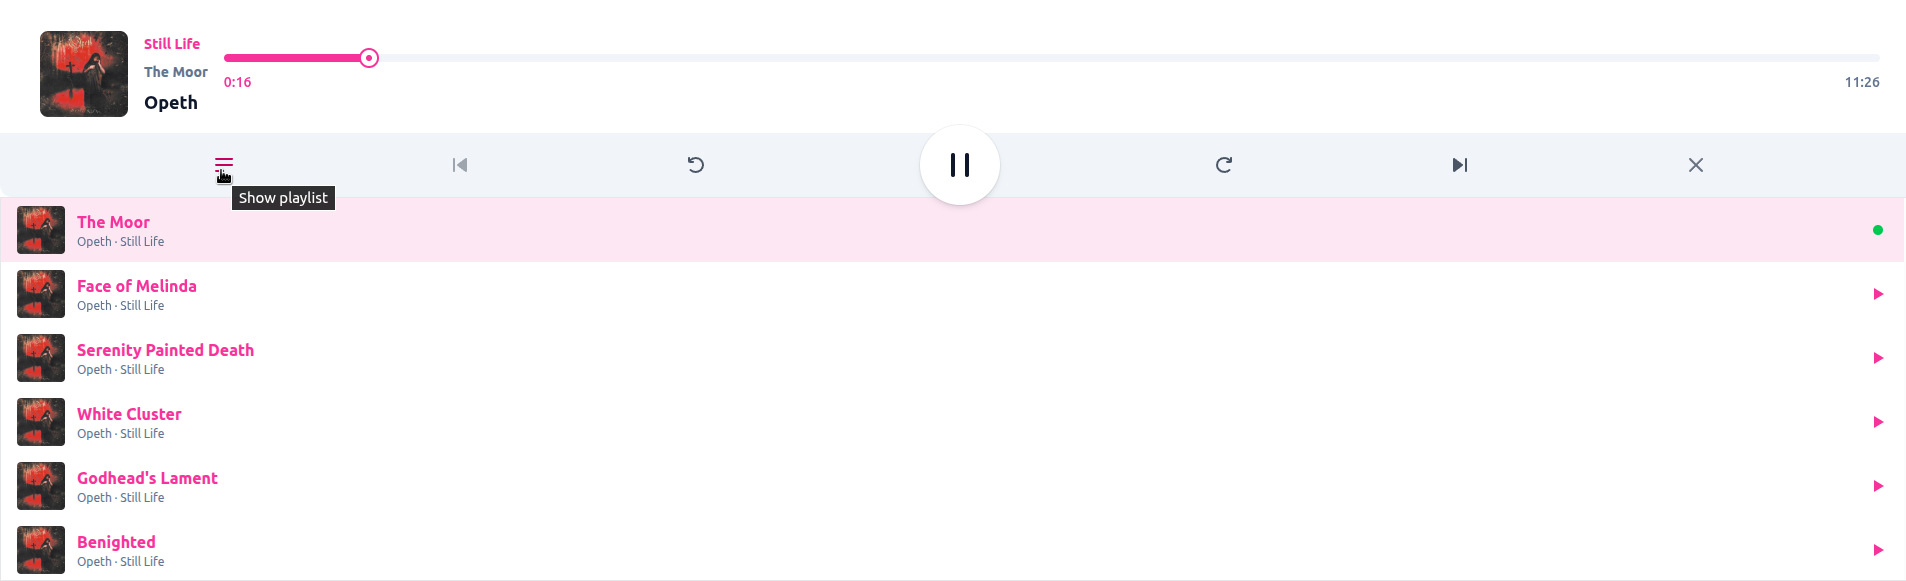
The playlist of the Player is a collapsible component, controlled by AlpineJS. You can decide to expand it or close it. At first you might think that this kind of state should only live in the client. In the end why would the Backend be interested if the playlist is expanded or not?
Well turns out it needs to, otherwise clicking on the “Next” button with the playlist expanded will render the player for the next song with the playlist collapsed. It makes sense if you think about it: we need to synchronize that information to ensure that the UI renders exactly how the user expects it.
Solving this problem is actually straightforward. We can leverage the hx-include attribute to include additional element values in the AJAX requests. Since it is inherited, it can be placed on a parent element, in our case in the Player component. The value is a CSS selector that points to a hidden input which carries the playlist open boolean value, bound using AlpineJS.
<div
  ...
  hx-include="[name='playlist-open']"
>
  <input type="hidden" name="playlist-open" x-model="playlistOpen" />

  ...
</div>
The Backend doesn’t do anything special with this value. It just uses it to render the correct appearance of the playlist when rendering the player.
$player = view('partials.player', [
   ...
   'playlistOpen' => $request->boolean('playlist-open', false),
])
   ->render();
Notifications
The app includes a very simple, but neat notification system.
When a song or an album starts playing, a notification is sent to the user by playing an animation on the bell icon in the header.
Since the notification is stored in the database (we’re leveraging Laravel notification here), we use backend code to trigger an event, which HTMX will then use to trigger a client-side action.
It is actually easier than it sounds. In the Controller action that renders the player when either a song or an album is started we create the notification for the user:
<?php

$request->user()->notify(new SongStarted($song));
Then we render the player and we send a specific response header to trigger an event in the client.
<?php

$player = view('partials.player', [
   'current' => $song,
])->render();

return response()->make($player)
   ->withHeaders([
      'HX-Trigger' => json_encode([
         PlayerEvent::SongStarted->value => [
            'song_id' => $song->id,
            'album_id' => $song->album_id,
         ]
      ])
   ]);
The HX-Trigger header instructs HTMX to trigger an event on the triggering element as soon as the response is received. The event will bubble up to the body, so it can be listened to anywhere in the DOM.
The notification button listens to this event (it uses the same PHP Enum, so sharing the same event between Frontend and Backend is trivial) and using AlpineJS we can add the animation to it.
The button also uses a GET request issued by HTMX to render the notifications sidebar.
<button
   x-on:{{ PlayerEvent::SongStarted->value }}.window="$el.classList.add('bell'); setTimeout(() => $el.classList.remove('bell'), 4000);"
   title="Notifications"
   hx-get="/notifications" hx-target="body" hx-swap="beforeend"
>
   <i class="bell-icon"></i>
</button>
This event/listener mechanism is very powerful because it allows for proper decoupling. Different parts of the UI can subscribe and decide if they want to react to this specific event.
Password Strength Component
Another interesting example is the password strength component. When changing a password in any website you need to adhere to specific requirements (e.g. at least 8 characters long, at least one number, one special character and so on). Usually these requirements mean that the validation logic must be duplicated: the Frontend gives immediate feedback, but Backend still needs to perform the validation (never trust client validation only).
With HTMX we just have to listen to the input changed event and submit the password to the Backend
 <input name="password" type="password" required
  hx-post="/password/strength"
  hx-trigger="input changed delay:300ms"
  hx-target="#password-feedback"
  hx-swap="innerHTML"
/>
<div id="password-feedback"></div>
The complexity of the password is evaluated and the feedback is rendered right after the input.
It’s not all fun and games
Any technology has its strengths and weaknesses. HTMX is no exception. It’s obviously the duty of the developer to know when a tool is right for the job, so I don’t pretend to suggest HTMX as a straight drop-in replacement for React/Vue or whatever you use.
While building HTMX Records I stumbled across some HTMX behaviors and limitations that were not immediately clear to me. In this section I would like to outline them.
- Dark Mode
Implementing Dark mode is straightforward with a little bit of Tailwind (using the appropriate classes) and AlpineJS to toggle the light/dark mode.
<button
  id="darkmode-toggle"
  type="button"
  @click="toggle"
>
  <template x-if="enabled">
    <i class="light-icon"></i>
  </template>

  <template x-if="!enabled">
    <i class="dark-icon"></i>
  </template>
</button>
As you can see AlpineJS uses template fragments to conditionally render HTML. This feature doesn’t play well with HTMX. For instance I’ve found that navigating back in history after toggling the dark mode was duplicating the button over and over.
HTMX implements its own history support which uses a local storage cache (since it changes the DOM dynamically, you cannot rely on the default browser bfcache). HTMX warns that this feature can be very tricky in combination with 3rd party JavaScript libraries that modify the DOM (source). In these cases they suggest to disable completely the history cache
<meta name="htmx-config" content='{"historyCacheSize": 0}'>
However in my case I was able to solve it by instructing HTMX to ignore the button completely, using the hx-ignore attribute. An annoying side effect of this choice is that the button flashes for a brief moment when navigating between pages because it’s essentially re-rendering again.
It’s not the end of the world though.
- Global JavaScript scope
Using hx-boost feels like using magic, but too much magic can hide weird bugs. Since navigating between pages does not refresh the global JavaScript scope, you can experience clashes with JavaScript initialization functions.
For instance in the codebase there is an AlpineJS component that is initialized using x-data
<script>
    document.addEventListener('alpine:init', () => {
        Alpine.data('component', () => ({
            ...
        }));
    })
</script>
This code works if you’re landing on a page for the very first time or if you’re refreshing that same page. But instead if you’re coming from any other page that already has AlpineJS initialized, it won’t register the component in the new page (because alpine:init has already run previously).
Therefore in order to support both cases we need to initialize the component differently. We can do this by pulling the init code inside a separate function and call it either directly if the Alpine object is already defined in window or after the alpine:init event.
<script>
    function initializeComponent() {
        Alpine.data('component', () => ({
            ...
        }));
    }

    if (typeof Alpine !== 'undefined') {
        initializeComponent();
    } else {
        document.addEventListener('alpine:init', () => {
            initializeComponent();
        });
    }
</script>
- Backend is your state
If you have always used JavaScript frontend frameworks to build UIs you probably have used some kind of state management library. With HTMX the central store becomes the server. The mental shift required to understand this fact cannot be underestimated. Changing the DOM extensively using plain JavaScript (either directly or via events) will hurt you if you don’t propagate those changes to the Backend, otherwise they will be completely wiped out after the next page render.
Even if HTMX supports Out of Band Swaps, I tried to not use it, preferring 1 UI update per request/response cycle, which perfectly fits the network model of the web.
Despite those hurdles, building complex UI patterns was surprisingly easy.
Where to go from here
While building HTMX Records I focused on getting the core features right, but there are a few areas I’d like to explore in the future.
Speculation Rules
One of the most exciting recent additions to the web platform is the Speculation Rules API. It allows you to hint to the browser which pages the user is likely to navigate to next, so the browser can prefetch or even prerender those pages in the background. When the user finally clicks the link, the page loads almost instantaneously.
Unlike the older <link rel="prefetch">, Speculation Rules are more expressive and configurable. You declare them as a JSON structure inside a <script type="speculationrules"> element:
<script type="speculationrules">
{
  "prefetch": [
    {
      "where": {
        "and": [
          { "href_matches": "/*" },
          { "not": { "href_matches": "/logout" } }
        ]
      }
    }
  ]
}
</script>
This tells the browser to prefetch all same-origin links except the logout page. You can also use "prerender" instead of "prefetch" for an even more aggressive optimization: the browser will fully render the page in a hidden tab, making the navigation feel truly instant. Prerendering is more expensive in terms of bandwidth and memory, so it should be used sparingly and only for high-confidence navigations.
What makes this particularly interesting for HTMX-based applications is that the Speculation Rules API is designed for Multi-Page Applications. It targets full document URLs, which is exactly how hx-boost works under the hood. Since hx-boost intercepts the navigation and swaps the body, a prefetched page would already be in the browser’s cache when HTMX requests it.
HTMX also provides its own preload extension which works by caching responses on mousedown or mouseover events. The Speculation Rules API takes this a step further by letting the browser decide the optimal time to preload, and it can even do full prerenders that the HTMX extension cannot. Combined together, they could make the application feel indistinguishable from a native app.
The API is still experimental and not yet available in all browsers, but it degrades gracefully: browsers that don’t support it simply ignore the <script> tag.
Handling 422 Responses
A common pattern in web applications is form validation. When a user submits a form with invalid data, the server typically responds with a 422 Unprocessable Entity status code along with the form re-rendered with error messages.
By default, HTMX treats any 4xx or 5xx response as an error and does not swap the response into the DOM. This means that if your server returns a 422 with a beautifully rendered form showing validation errors, the user will never see it.
Fortunately, HTMX provides a way to configure this behavior through the responseHandling configuration. By adding the following <meta> tag, you can instruct HTMX to swap the content of 422 responses just like it would for a successful 2xx response:
<meta
  name="htmx-config"
  content='{
    "responseHandling":[
      {"code":"204", "swap": false},
      {"code":"[23]..", "swap": true},
      {"code":"422", "swap": true},
      {"code":"[45]..", "swap": false, "error":true},
      {"code":"...", "swap": true}
    ]
  }'
/>
With this configuration the server can respond with a 422 status code and return the form HTML with inline validation errors, and HTMX will swap it into the page as usual. This keeps the validation logic entirely on the server side, eliminating the need to duplicate it in JavaScript.
In HTMX Records I haven’t implemented this yet, but it would be particularly useful for the login and registration forms, where server-side validation is critical.
Conclusion
SPA frameworks tend to be complex, and you don’t get a lot of benefit for all that complexity in many cases.
The HTMX Records project was a resounding success. It proved that you don’t need a 2MB JavaScript bundle to play music, navigate pages smoothly, or provide real-time feedback. By sticking to the fundamentals — HTTP, HTML, and CSS — we pushed the limits of what is considered “possible” without a framework. The result is an application that is fast, maintainable, and remarkably lightweight.
And the numbers back this up. Running a Lighthouse audit on the application yields excellent scores across the board:
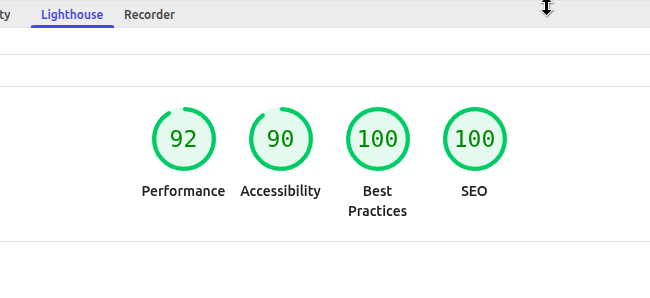
These results are not surprising when you think about what we are not shipping: no framework runtime, no client-side router, no state management library, no build step artifacts. The HTML that the server sends is the HTML that the browser renders. There is no hydration step, no virtual DOM diffing, no JavaScript that needs to execute before the user can interact with the page.
Of course, HTMX is not a silver bullet. As I outlined above, there are quirks and trade-offs. The mental shift from client-side state management to server-driven UI is real and can be uncomfortable at first. Some patterns that are trivial in React or Vue require more creative thinking in this model. And if your application genuinely needs complex client-side interactivity — a collaborative text editor, a real-time dashboard with dozens of independent widgets — a JavaScript framework might still be the right tool.
But for the vast majority of web applications out there — the CRUD apps, the content sites, the e-commerce stores, the admin panels — the HALT stack offers a compelling alternative. One that respects the architecture of the web rather than fighting against it, and that lets you ship features instead of wrestling with tooling.
If you are feeling the JavaScript fatigue, maybe it’s time to HALT and look at what the platform can natively do for you.
these days we’re crippled by the AI Fatigue. ↩︎