
Introduction
Recently I stumbled upon this excellent article by Damon Janis about how to deploy a Phoenix web app to a single Linux server, optimizing for cost effectiveness, control, and simplicity.
If you haven’t already, then you should read it immediately. It contains a ton of useful information, not only Elixir-related.
In this post I want to integrate the previous article with the approach that I used during the deployment of one of my latest Elixir side-projects. Keep in mind that I just recently started to work with Elixir, therefore the following might not be the most accurate or correct way to deploy Elixir apps.
In any case, my focus is still going to be on simplicity and cost effectiveness.
Build the App
Building the application is out of the scope of this article. My side-project is nothing more than a small API application built with Cowboy, Plug and Poison. For such a small app, a full-featured framework like Phoenix seemed an overkill. For this reason I’m going to skip the sections that are specific to Phoenix or to the database setup.
If you want to know how to build a small application with these technologies you can read this excellent tutorial written by Jon Lunsford.
However I’m still going to add a few notes considering that that article is almost 2 years old and a few things have changed in the Elixir world (particularly in version 1.9).
Update the Configuration
The Mix.Config module, which was specific to Mix, has been deprecated. Now the recommended way to use configuration in Elixir is to use the Config module which has been introduced in versio 1.9 as a replacement.
The migration is straightforward. All you have to do is to replace use Mix.Config at the top of your config files by import Config and replace all Mix.env() calls by config_env().
The configuration then becomes:
#./config/config.exs

# This file is responsible for configuring your application
import Config

import_config "#{config_env()}.exs"

------------------------

# ./config/dev.exs

import Config

config :my_application, port: 4000

------------------------

# ./config/test.exs

import Config

config :my_application, port: 4001

------------------------

# ./config/prod.exs

import Config

config :my_application, port: 80
We’re going to make another small change that is going to simplify your life during development and during the deployment process.
Compile-time vs Run-time configuration
I noticed that there’s a lot of confusion (here here and here) about Elixir configuration and environment variables. I read a lot about this subject and I was confused too when I started using Elixir for something more complex than a Hello World application.
Most of this confusion is caused by two things:
- Elixir is a compiled language and as such, (almost) every information needed for the code to compile needs to be available at compilation time. This is confusing especially for developers coming from interpreted languages like PHP, Ruby or JavaScript, where configuration is always read at runtime. That’s why packages like dotenv are so popular 1. They allow to work easily with environment variables, injecting them at runtime to the application.
Let’s take a look to an example in Elixir to illustrate the problem:
defmodule MyApplication.APIClient do
  @api_key System.get_env("API_KEY")
end
In this case the environment variable it’s called during a module attribute assignent, which is evaluated at compile time. Therefore if the environment variable does not exist during compilation, the api_key will be initialized with nil.
The same concept applies if you’re calling System.get_env/1 inside a config file (which is the most common scenario) and then assign the result to a module attribute:
# config/config.exs
config :my_application, :api_client,
  api_key: System.get_env("API_KEY")

# lib/my_application/api_client.ex
defmodule defmodule MyApplication.APIClient do
  @api_key Application.get_env(:my_application, :api_client)[:api_key]
end- Before Elixir 1.9 it was not possible to provide configuration at runtime. This problem has been acknowledged by José Valim himself and has been solved by introducing two additional configuration files.
In Elixir 1.11, which at the time of writing is the most recent version, we have the following options for configure an Elixir application:
config/config.exs: available to Mix & Releases, evaluated at compile time#{config_env()}.exs- i.e.dev.exs,prod.exs,test.exs- environment-specific configuration files evaluated at compile timeconfig/releases.exs- runtime configuration for release only (since v1.9)config/runtime.exs- available to Mix & Releases (since v.1.11), evaluated at runtime and that will eventually deprecateconfig/releases.exs
With this knowledge at our disposal we can finally decide how to structure the configuration. In my opinion this is the most simple approach, especially for people that have just started to work with Elixir:
- use
config.exsfor configuration that is common to all environments, without using environment variables - use
dev.exsfor all your local configuration. If you have to hide sensible information from version control you can import aconfig/dev.secret.exsand add**/*.secret.exsto your.gitignorefile. Working with environment variables locally is always tricky - use
prod.exsfor production configuration that is not dependent from environment variables - use
runtime.exsfor environment variable dependent configuration. Finally wrap all the code in this file to run only if the environment is production:
import Config

if config_env() == :prod do
  config :my_application, port: String.to_integer(System.fetch_env!("PORT"))

  ...
end
I’m aware that this setup is an evident violation of the twelve-factor app methodology, precisely the Configuration based on Environment variables chapter, but as I said in this article I’m trying to privilege simplicity. If you still want to make use of environment variables locally there are interesting projects such as direnv that makes you load and unload environment variables depending on the current directory.
7 — Install Erlang, Elixir, Node, and Postgres
Now we can continue to follow Damon’s article and introduce the first change to his approach: we’re not going to install Erlang and Elixir because we can now (since v1.9) leverage the Mix release task, which provides a built in alternative to tools like Distillery.
Releases allow developers to precompile and package all of their code and the runtime into a single unit. Single unit means that each release is self-contained. All your source code is precompiled and packaged. Releases do not even require Erlang or Elixir in your servers, as it includes the Erlang VM and its runtime by default. Furthermore, both Erlang and Elixir standard libraries are stripped to bring only the parts you are actually using.
This also means that we’re not going to create the release directly on the production server, but we’re going to pack it directly from our computer using Docker, as we will see later.
In theory even NodeJS is not needed on the production server because you can compile frontend assets in the same pipeline that builds the Elixir release and then pack generated files as a module overlay.
However if you’re working in a team you should definitely set up an automatic CI/CD pipeline to build and push your compiled artifacts to production, instead of pushing from your local computer.
Notice: you can follow Damon’s original article if you want to know how to install and configure Postgres.
10 — Connect to your remote Git repo where your project lives
Since we’re pushing the release from the outside, instead of pulling the source code and compiling it directly on the production server, there’s no need to configure any authentication with your remote Git repository. And having less SSH keys floating around is always good.
11 — Get your app secrets onto the server
As I mentioned before, all the application secrets are going to be available at runtime through environment variables. Therefore there’s no need to copy any additional file on the production server.
Let’s see instead how can we build the application locally and then copy the artifact on the production server.
Prepare the App for Release
Before we build our release, we will have to make a few changes to our application to get it ready for building releases. A release can be configured in your mix.exs file under the :releases key inside def project:
defmodule MyApplication.MixProject do
  ...

  def project do
    [
      app: :my_application,
      version: "0.1.0",
      elixir: "~> 1.11",
      start_permanent: Mix.env() == :prod,
      deps: deps(),
      description: "",
      elixirc_paths: elixirc_paths(Mix.env()),
      releases: [
        production: [ # the name of the release. We can add more configurations if we want
          include_executables_for: [:unix], # we'll target only Linux
          applications: [runtime_tools: :permanent], # see https://hexdocs.pm/mix/Mix.Tasks.Release.html#module-options
          steps: [:assemble, :tar] # assembles the release and builds a tarball of it
        ]
      ]
    ]
  end

  ...
end
You probably might already know that, before building an Elixir application, you need to make sure that the machine you build on is the same as the machine that you deploy to.
In fact to deploy straight from a host to a separate target without cross-compilation, the following must be the same between the host and the target:
- Target architecture (for example,
x86_64orARM) - Target vendor + operating system (for example,
Windows,Linux, orDarwin/macOS) - Target ABI (for example,
muslorgnu)
This means that if you are building on a MacBook (x86_64-apple-darwin) and trying to deploy to a typical Ubuntu machine (x86_64-unknown-linux-gnu), the release will not work. The same applies if you’re building from an Alpine Linux Image to deploy on an Ubuntu machine.
That’s why Docker containers makes the building step trivial. You just have to use a container image that matches your target environment.
Earthly
In order to build our application we’re going to use Earthly.
Earthly is a build automation tool where Docker containers are used to enforce build repeatability. All builds are containerized, repeatable, and language agnostic.
Earthly is getting a lot of traction in the Elixir community because the team working on the Phoenix Framework have decided to adopt it in order to define the whole build process, unit tests, integration tests, service setup and so on, in a format that could be run anywhere.
After the installation, you can create an empty Earthfile which will contain the instructions to configure your build process.
FROM elixir:1.11.3

all:
    BUILD +build

build:
    ARG APP_NAME=my_application
    ARG MIX_ENV=prod
    ARG APP_VERSION=0.1.0
    RUN apt-get update
    RUN apt-get install build-essential -y
    WORKDIR /src/
    COPY --dir config lib ./
    COPY mix.exs .
    COPY mix.lock .
    RUN mix local.hex --force
    RUN mix local.rebar --force
    RUN mix do deps.get --only prod, release
    SAVE ARTIFACT _build/${MIX_ENV}/${APP_NAME}-${APP_VERSION}.tar.gz AS LOCAL build/${APP_NAME}-${APP_VERSION}.tar.gz
An Earthfile look very much like a Dockerfile. This is an intentional design decision, so existing Dockerfiles can be ported to earthfiles by copy-pasting them over and then tweaking them slightly.
The syntax is straightforward. Starting from the official Elixir Alpine image we instruct Earthly to copy our source code in the container, then we install production dependencies and finally we create the release. The last line allows us to save the output of the build command as an artifact on the host as a local file (my_application-0.1.0.tar.gz), in the build folder. This local file is only written if the entire build succeeds.
Now you can try to run it:
$ earthly +buildYou might have noticed that the Earthfile contains two environment variables APP_NAME and APP_VERSION. They have hardcoded default values, but you can override them when running Earthly. For example we can create a bash build script that takes the application version out of the mix.exs file and injects it in the Earthfile
#!/bin/bash
set -e

VERSION=$(cat mix.exs | grep version | sed -e 's/.*version: "\(.*\)",/\1/')

earthly --build-arg APP_VERSION=$VERSION +build
Finally we can make this file executable and run it. The following is an excerpt of the output:
    +build | * building /src/_build/prod/my_application-0.1.0.tar.gz

    +build | Release created at _build/prod/rel/my_application!

    +build |     # To start your system
    +build |     _build/prod/rel/my_application/bin/my_application start

    +build | Once the release is running:

    +build |     # To connect to it remotely
    +build |     _build/prod/rel/my_application/bin/my_application remote

    +build |     # To stop it gracefully (you may also send SIGINT/SIGTERM)
    +build |     _build/prod/rel/my_application/bin/my_application stop

    +build | To list all commands:

    +build |     _build/prod/rel/my_application/bin/my_application

    +build | --> SAVE ARTIFACT _build/prod/my_application-0.1.0.tar.gz +build/my_application-0.1.0.tar.gz AS LOCAL build/my_application-0.1.0.tar.gz
    output | --> exporting outputs
    output | [██████████] copying files ... 100%
    output | [██████████] sending tarballs ... 100%
=========================== SUCCESS ===========================
    +build | Artifact github.com/mauricius/my_application:master+build/my_application-0.1.0.tar.gz as local build/my_application-0.1.0.tar.gz
You can also define a test target in Earthly to run your Elixir tests, for example
FROM elixir:1.11.3

all:
    BUILD +test # new target
    BUILD +build

test:
    RUN apt-get update
    RUN apt-get install build-essential -y
    WORKDIR /src/
    COPY --dir config lib test ./
    COPY mix.exs .
    COPY mix.lock .
    RUN mix local.hex --force
    RUN mix local.rebar --force
    RUN mix deps.get
    RUN mix test

...
Earthly can also be easily integrated in your favorite CI service.
Copy the artifact and run the application
You can copy the artifact on the production server using scp
$ scp build/my_application-0.1.0.tar.gz <remote host>:~/my_application/extract its content
$ tar -xvf my_application-0.1.0.tar.gz --one-top-levelthe --one-top-level flag will extract all files into a subdirectory named by the base name of the archive (in this case my_application-0.1.0).
Finally you can start the application (remember to set all the required environment variables first)
$ PORT=4000 my_application-0.1.0/bin/my_application startLater we will see how to automate this step using a deployment script.
12 — Install Nginx + Certbot for SSL
Achieving zero downtime with plain Elixir, as Damon already pointed out, is impossible as far as I know. If your application can survive a few seconds of downtime, stopping the old instance before running the new one is without any doubt the easiest approach.
However if you still want zero downtime, the reverse proxy route is definitely the simplest strategy because you can programmatically reroute traffic from the old version to the new version.
Erlang and Elixir are sometimes known for the capability of upgrading a node that is running in production without shutting down that node. This feature, know as hot code upgrade, is not supported out of the box by Elixir releases and it’s discouraged because it’s very complicated to perform in practice.
I wanted to explore a different solution than Nginx because I don’t like the idea of changing its configuration on every deployment. My aim was to adopt an automatic solution, capable of detecting autonomously which service was alive.
Enter Traefik
Traefik is an open-source Edge Router that automatically discovers the right configuration for your services. Traefik inspects your infrastructure, where it finds relevant information and discovers which service serves which request.
Traefik is natively compliant with every major cluster technology, such as Kubernetes, Docker, Docker Swarm, AWS, Mesos, Marathon, but luckily for us it also works for legacy software running on bare metal.
Installing Traefik is very simple. You can use the binary distribution and set it up to run as a service with systemd.
The Let’s Encrypt configuration is also straightforward and well documented.
13 — Configure Nginx Traefik to reverse proxy requests to your app
Before configuring Traefik we have to add another endpoint to our Elixir application. This endpoint will be used by Traefik to determine the health of the application so it knows when to remove unhealthy services from the load balancing rotation.
The enpoint is a simple as the following
# router.ex

get "/ping" do
  send_resp(conn, 200, "pong!")
end
Now we can go ahead and configure Traefik. From the documentation we can read that configuration in Traefik can refer to two different things:
- The fully dynamic routing configuration (referred to as the dynamic configuration)
- The startup configuration (referred to as the static configuration)
Elements in the static configuration set up connections to providers and define the entrypoints Traefik will listen to (these elements don’t change often).
The dynamic configuration contains everything that defines how the requests are handled by your system. This configuration can change and is seamlessly hot-reloaded, without any request interruption or connection loss.
When you start Traefik, you define entrypoints (in their most basic forms, they are port numbers). Then, connected to these entrypoints, routers analyze the incoming requests to see if they match a set of rules. If they do, the router might transform the request using pieces of middleware before forwarding them to your services.
The following diagram summarizes how the request is handled and routed by Traefik and the type of configuration that handles each entity:
          |---- Static ----||-------------------- Dynamic ---------------------|
            _____________      _________      _______________      __________
           |             |    |         |    |               |    |          |
Request -> | Entrypoints | -> | Routers | -> | (Middlewares) | -> | Services | -> Your Services
           |_____________|    |_________|    |_______________|    |__________|
Static Configuration
Let’s start with the static configuration. There are three different, mutually exclusive, ways to define static configuration options in Traefik:
- In a configuration file
- In the command-line arguments
- As environment variables
To keep things simple we’re going to use a single configuration file. Traefik supports configuration files written in TOML or YAML, so we’re going to create a new traefik.yml (I still can’t wrap my head around TOML syntax 😑) which will be loaded automatically by Traefik at startup (if you’re using it as daemon you can provide the file to the executable using the --configfile option)
entryPoints:
  web:
    address: ":80"

  websecure:
    address: ":443"

providers:
  file:
    filename: traefik-dynamic-conf.yml

certificatesResolvers:
  myresolver:
    # Enable ACME (Let's Encrypt): automatic SSL.
    acme:
      # Email address used for registration.
      email: "test@example.com"

      # File or key used for certificates storage.
      storage: "acme.json"

      httpChallenge:
        # used during the challenge
        entryPoint: web

api:
  dashboard: true
  insecure: true
This configuration is pretty simple:
- we have two entrypoints to our application: HTTP (on port
80), and HTTPS (on port443) - given that we don’t have orchestrators or service registries, we can use the file provider to provide the dynamic configuration. We’re referencing a single
traefik-dynamic-conf.ymlfile which we’re going to create later. - the
certificatesReolverssection is used to enable SSL certificates through Let’s Encrypt - finally we enable the Traefik dashboard in Insecure mode to inspect the status of our services. Remember to add authentication or to remove it in production.
Dynamic Configuration
The Dynamic Configuration is defined at runtime by the so-called providers: whether an orchestrator, a service registry, or a plain old configuration file.
As always, we want to keep things simple so we’re going to create a configuration file, called traefik-dynamic-conf.yml. Let’s have a look
http:
  middlewares:
    test-redirectscheme:
      redirectScheme:
        scheme: https
        permanent: true

  routers:
    to-my-application:
      rule: "PathPrefix(`/`)"
      entryPoints:
        - "websecure"
      # If the rule matches, forward to the whoami service (declared below)
      service: my-application

  services:
    my-application:
      loadBalancer:
        healthCheck:
          path: /ping
          interval: "10s"
          timeout: "3s"
        servers:
        - url: http://localhost:4000
- url: http://localhost:4001- The
middlewaressection takes uses theredirectSchememiddleware to rederect HTTP traffic to HTTPS. Traefik offers several middlewares out of the box. - The
routerssection is used to define a connection between requests and services. Basically we’re telling Traefik to forward all the traffic ("PathPrefix('/')"), coming from thewebsecureentrypoint, to themy-applicationservice. - The
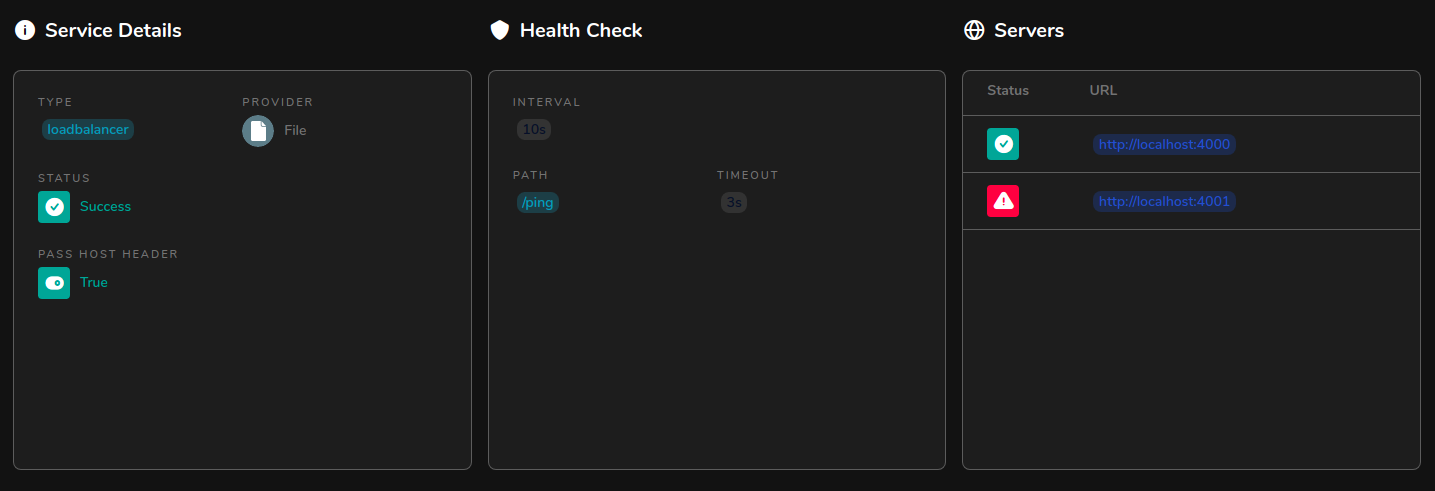
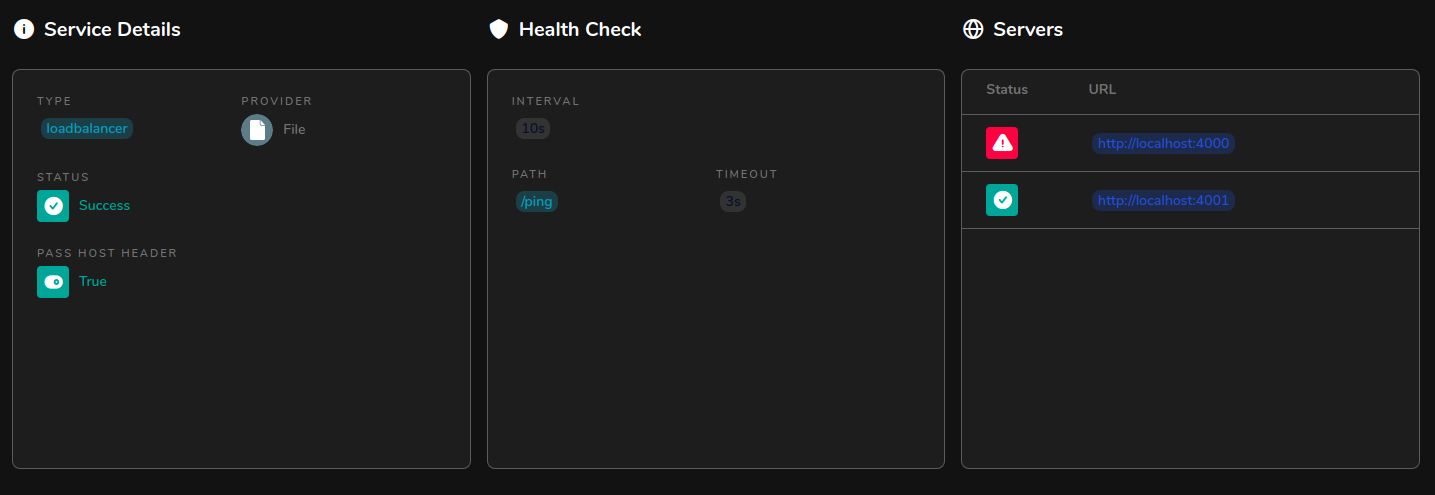
servicessection defines which services are available in our infrastructure. Considering that we plan to run our Elixir application alternately on port 4000 and on port 4001, we can define both urls under the load balancer. Traefik will automatically reroute the requests on the active endpoint, which will be determined by the successful request (status code between 2xx and 3xx) of thepathurl, invoked every 10 seconds with 3 seconds of timeout.
That’s it! Now we can start Traefik with the static configuration:
$ ./traefik --config=traefik.ymlAnd we can see, by visiting the dashboard <your host>:8080/dashboard, that one of the servers is alive and the other is not.
14 - Build a deployment shell script
Now we can shamelessly copy the deployment script written by Davon in his article. We’re just have to tweak a few things:
#!/bin/bash
set -e

VERSION=$1

# Update to latest version of code
cd /home/<YOUR_USERNAME>/my_app
sed -i 's/LATEST_RELEASE=.*/LATEST_RELEASE='$VERSION'/g' env_vars

# Extract latest release
tar -xvf my_application-$VERSION.tar.gz --one-top-level

# Find the port in use, and the available port
if $(curl --output /dev/null --silent --fail localhost:4000)
then
  port_in_use=4000
  open_port=4001
else
  port_in_use=4001
  open_port=4000
fi

# Update release env vars with new port and set non-conflicting node name
echo "export PORT=${open_port}" >> my_application-$VERSION/releases/$VERSION/env.sh
echo "export RELEASE_NODE=my_app-${open_port}" >> my_application-$VERSION/releases/$VERSION/env.sh

echo "Starting the app on port ${open_port}"

# Start new instance of app
sudo systemctl start my_app@${open_port}

# Pause script till app is fully up
until $(curl --output /dev/null --silent --fail localhost:$open_port); do
   printf 'Waiting for app to boot...\n'
   sleep 1
done

# Stop previous version of app
sudo systemctl stop my_app@${port_in_use}
And just like Damon’s approach, let’s create the env_vars file that our script references, and populate it with initial data.
LATEST_RELEASE=We can also add all of our environment variables to this file because we are going to add a reference to the file in the systemd configuration.
15 — Create systemd services
The last step before running the deployment script, is to create the systemd service that starts up the app. This step is pretty much identical to Damon’s therefore you can follow his instructions. I’m just going to reference my configuration files.
# /etc/systemd/system/my_app@.service

[Unit]
Description=My App
After=network.target
StartLimitIntervalSec=0

[Service]
Type=simple
Restart=always
RestartSec=1
User=<YOUR_USERNAME>
SyslogIdentifier=myApp

EnvironmentFile=/home/<YOUR_USERNAME>/env_vars
ExecStart=/bin/bash -c '/home/<YOUR_USERNAME>/my_application-${LATEST_RELEASE}/bin/my_application start'
And the configuration for the systemd service that will be responsible for running our deploy script automatically if the server ever restarts unexpectedly.
# /etc/systemd/system/my_app_start_on_boot.service

[Unit]
Description=Starts My App when server is rebooted
After=network.target

[Service]
Type=simple
User=<YOUR_USERNAME>

ExecStart=/home/<YOUR_USERNAME>/deploy.sh

[Install]
WantedBy=multi-user.target
Finally we can enable the service
$ sudo systemctl enable my_app_start_on_boot16 — Deploy the app
Now we can finally deploy the app.
$ ssh my_app 'bash -s' < deploy.sh 0.1.0If all goes well, you should see the following output
[...]
Starting the app on port 4000
Waiting for app to boot...
Waiting for app to boot...
Waiting for app to boot...
and finally you should be able to visit your domain and see the app running!
You can also try to deploy a new version of the application. Just change the version number in the mix.exs file, build the new artifact and run the deploy script with the new version
$ ssh my_app 'bash -s' < deploy.sh 0.2.0After a few seconds you should see that Traefik has successfully rerouted the load balancer to the new application instance.
Thanks Bodo for reviewing this post 😉
There are equivalent packages in Elixir though, https://github.com/BlakeWilliams/envy and https://github.com/avdi/dotenv_elixir ↩︎