
Introduction
Recently I had the need to create a custom form in the backend, using the API and InputField modules that ProcessWire provides. Think InputFields as the basic building blocks to create forms in ProcessWire. They are used all over the administration panel, and provide styling (via jQuery UI), validation ad error rendering (through the FormBuilder) out of the box.
Here is an example of how you can use the API to create a basic form. The code is taken from this PW forum thread written by Soma. It’s pretty straightforward, just follow the comments.
<?php

// the variable that holds the form output
$out = '';

// create a new form field (also field wrapper)
$form = $modules->get("InputfieldForm");
$form->action = "./";
$form->method = "POST";
$form->attr("id+name",'subscribe-form');

// the previous function ("id+name") is the same as:
// $field->attr('id', 'subscribe-form');
// $field->attr('name', 'subscribe-form');

// create a text input
$field = $modules->get("InputfieldText");
$field->label = "Name";
$field->attr('id+name','name');
$field->required = 1;
$form->append($field); // append the field to the form

// create email field
$field = $modules->get("InputfieldEmail");
$field->label = "E-Mail";
$field->attr('id+name','email');
$field->required = 1;
$form->append($field);

// you get the idea
$field = $modules->get("InputfieldPassword");
$field->label = "Password";
$field->attr("id+name","pass");
$field->required = 1;
$form->append($field);

// finally a submit button!
$submit = $modules->get("InputfieldSubmit");
$submit->attr("value","Subscribe");
$submit->attr("id+name","submit");
$form->append($submit);

// check if the form was submitted so we process the form
if($input->post->submit) {

    // user submitted the form, process it and check for errors
    $form->processInput($input->post);

    // here is a good point for extra/custom validation and manipulate fields
    $email = $form->get("email");

    if($email && (strpos($email->value,'@hotmail') !== FALSE)) {
        // attach an error to the field and
        // it will get displayed along the field
        $email->error("Sorry we don't accept hotmail addresses for now.");
    }

    if($form->getErrors()) {
        // the form is processed and populated
        // but contains errors
        $out .= $form->render();
    } else {
        // do with the form what you like, create and save it as page
        // or send emails. to get the values you can use
        // $email = $form->get("email")->value;
        // $name = $form->get("name")->value;
        // $pass = $form->get("pass")->value;
        //
        // to sanitize input
        // $name = $sanitizer->text($input->post->name);
        // $email = $sanitizer->email($form->get("email")->value);

        $out .= "<p>Thanks! Your submission was successful.";
    }
} else {
    // render out form without processing
    $out .= $form->render();
}

echo $out;
ProcessWire InputFields
ProcessWire offers a lot of InputFields, which can probably cover most requirements. However if you don’t find the one which suits your need, you can freely rollup your own because the CMF is easily extendable. Just write a new module;
This is the list of InputFields available as PW 3.0.85:
- InputFieldAsmSelect
- InputFieldCheckboxes
- InputFieldCKEditor
- InputFieldDateTime
- InputFieldFile
- InputFieldIcon
- InputFieldImage
- InputFieldPage
- InputFieldPageAutocomplete
- InputFieldPageListSelect
- InputFieldPageName
- InputFieldPageTable
- InputFieldPageTitle
- InputFieldPassword
- InputFieldRadios
- InputFieldSelector
- InputFieldSubmit
- InputFieldButton
- InputFieldCheckbox
- InputFieldEmail
- InputFieldFieldset
- InputFieldFloat
- InputFieldForm
- InputFieldHidden
- InputFieldInteger
- InputFieldMarkup
- InputFieldName
- InputFieldSelect
- InputFieldSelectMultiple
- InputFieldText
- InputFieldTextarea
- InputFieldURL
InputFieldDateTime
It would be interesting to cover each InputField in a separate blog post (maybe one day), however in this case we are going to discuss the InputFieldDateTime, which is a little more complex than the others.
For this example we are going to build a form for creating events. Each event has a title, a starting datetime, an ending datetime and a description. Later we will be able to extract each event in the frontend using PW selectors.
The following is the datestart field rendered in the administration panel:

First let’s create our form:
<?php
$form = $this->modules->get('InputfieldForm');

$form->action = "./";
$form->method = "POST";
Then we need to add the title field:
<?php
$field = $this->modules->get('InputfieldText');
$field->attr('id+name', 'title');
$field->label = "Title";
$field->required = true;
$form->add($field);
Then comes the first DateTime field. First we need to get the module and add a few attributes:
<?php
$field = $this->modules->get('InputfieldDatetime');
$field->attr("id+name","start");
Then we can add a label and a Font-Awesome icon (without the fa- prefix), that will be rendered before the label. The red asterisk rendered after comes from the required attribute.
<?php
$field->label = 'Start Date';
$field->icon = 'calendar';
$field->required = true;
You can optionally add one or more CSS classes, if you want to style further the component.
<?php
$field->attr('class', 'myClass mySecondClass');
The InputField gets its own classes based on the datepicker attribute, which defines the behavior of the jQuery UI DatePicker component. We can use integers or the predefined InputFieldDatetime constants to set the preferred value.
- No date/time picker (
InputfieldDatetime::datepickerNoor0)
The field will render like a simple text field, without datepicker.
- Date/time picker on button click (
InputfieldDatetime::datepickerClickor1)
It will render a small calendar next to the input. The datepicker can be opened only by clicking on it.

- Inline date picker always visible (no time picker) (
InputfieldDatetime::datepickerInlineor2)
In this case the date picker will be always visible (but we cannot use the time picker). Here is how it renders:

- Date/time picker on field focus (
InputfieldDatetime::datepickerFocusor3)
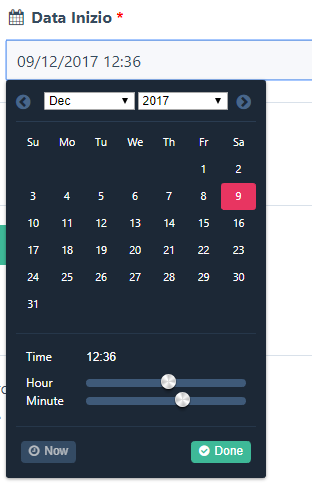
This is the recommanded way to render the component.
<?php
$field->datepicker = InputfieldDatetime::datepickerFocus;
Next we need to define valid formats for date and time inputs. You can use whatever format the PHP Date offers to you. I live in Europe so I’m going to use the following:
<?php
$field->dateInputFormat = 'd/m/Y';
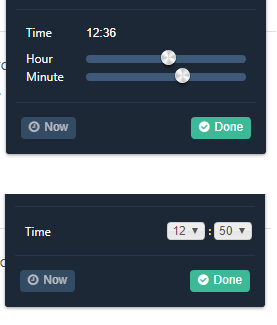
$field->timeInputFormat = 'H:i';By using the timeInputFormat you tells PW to also render the Time picker for the field. You can also customize the controls that will be used to choose the time. There are two choices:
- Sliders (default or 0) let the user slide controls to choose the time,
- Select (1) lets the user select the time from a drop-down select.
Here is how you can set the value:
<?php
$field->timeInputSelect = 0;
And here is how PW renders each one of them:
Finally we set the value of the field (current date and time) and the percentage width of the field, so we can put the start and end field on the same line:
<?php

$field->attr("value", time());
$field->columnWidth = 50;
Now we need only to add the field to the form:
<?php

$form->add($field);
The second datetime field now is straightforward.
That’s it!