
Introduction
In this tutorial we will learn how to manage content in a ProcessWire website using a Telegram bot.
Today responsive bots are on everyone’s mouth, so I decided to take a deep dive into this new (at least for me) world to learn something new, but also to build something useful using my favourite CMS.
Notice: If you don’t where to start with ProcessWire, I suggest you to look at my 4-part series “How to build a basic webiste with ProcessWire”.
The idea for this tutorial came into my mind while thinking for new ways for managing content inside a PW website. Sometimes clients are much more comfortable with their cellphones, instead of using a full featured administration panel, despite being really easy to use. So I decided to give it a shot and try if it would be possible to leverage a Telegram bot to talk directly with the ProcessWire instance. Turns out that it’s really easy and requires very little work.
The aim of this tutorial is to teach you how to use a Telegram BOT to interact with ProcessWire APIs. We will cover the required code needed in order to create new photogalleries and to upload new photos inside them, just by using our phone.
Starting up
Throughout the tutorial we will use a couple of external packages to help us building the final product. We need the following:
- An existing ProcessWire 3 installation on PHP >= 7.0.0 and HTTPS enabled
- A PHP router. We will use it to extend ProcessWire to provide some basic APIs, although it is not strictly required for this tutorial. I decided to use PHPRoute
- Symfony Cache and HTTP Foundation packages
- Botman and the corresponding Telegram Driver
I also suggest you to install the CustomUploadNames module that automatically renames file uploads according to a configurable format.
Add dependencies and set up ProcessWire
First let’s add our dependencies. Point your terminal to the root of the site and install all the required packages:
composer require mrjgreen/phroute
composer require symfony/cache
composer require symfony/http-foundation
composer require botman/botman
composer require driver-telegram
Then log in into ProcessWire’s administration panel and create three new templates, each one with a corresponding physical file in the /site/templates folder:
gallery-indexwith just thetitlefieldgallerywith thetitlefield and animagefield to hold the images. Let’s call itimages. Make sure that it accepts multiple elements and also set suitable values for resizing the images during the upload process.apithis will be our main entry point. Make sure to use this template only for one page and check that URL segments are allowed.
Notice:
For completeness, set the gallery template as the only template allowed for children in the tab Family of the gallery-index template. Do the same thing for the gallery template, under templates allowed for parent.
Finally go ahead and create a new page with the api template (using the url /api) and a few galleries, if you want.
Install the CustomUploadNames module
Next we need to install the CustomUploadNames module. This module automatically renames uploads according to a configurable format, so we don’t end up with strange file names such as DSC0001.jpg or file_1.jpg. This should also help the SEO ranking of our website.
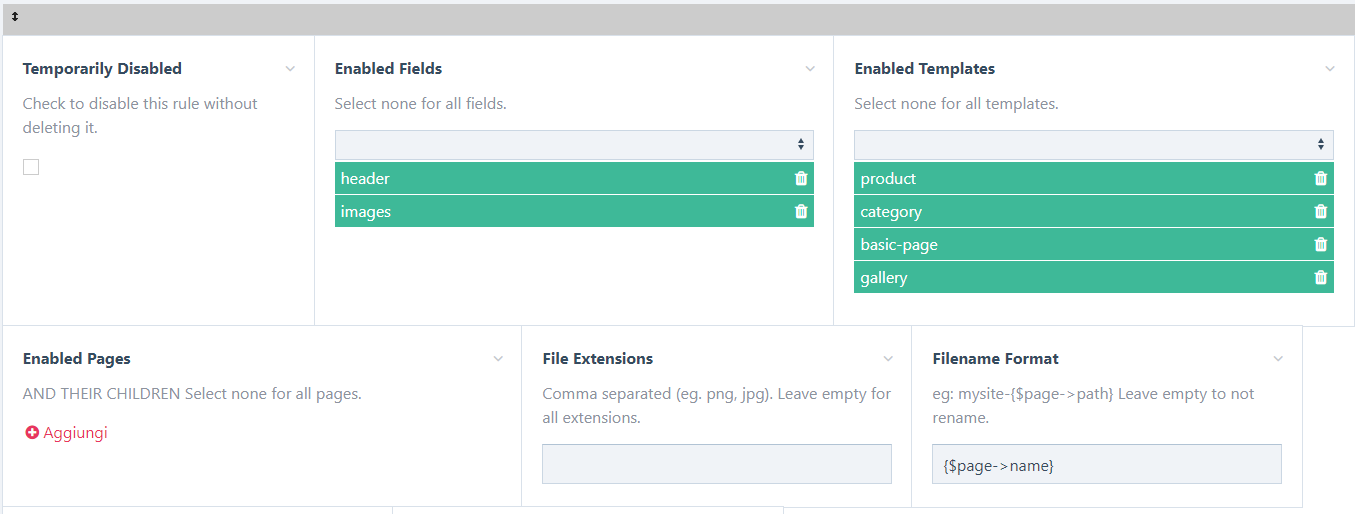
Follow the instructions to install it, than open up the configuration page and add the images field inside the enabled fields, and also select the gallery template for the enabled templates. Finally choose a valid rule for filename format. I always use the page name, like this {$page->name}.
Create the Telegram BOT

Creating a new Telegram BOT is really easy. Follow the official documentation and you should be able to get up and running quickly. I will however highlight the main passages so you can follow along:
Open the Telegram App on your phone and search for the “botfather” telegram bot. He’s the one that will assist you with creating and managing your bot.
Type
/helpto see all possible commands the botfather can handle. We are interested in the/newbotcommand that let’s you create a new bot.Click on or type
/newbotto create a new bot.Follow instructions and choose a new name for your bot. Since it has to be a unique name I suggest you to namespace it, for example by adding your name before it in its username. On the contrary its screen name can be whatever you like. You can also set a profile picture and a description for it.
Congratulations! Your bot has been created. You should see a new API token generated for it, please copy it and save in a safe place, we will use it later. Now you can search for your newly created bot on Telegram.
As a last step, inside the “botfather” conversation edit your new bot and use the command
/setcommandsfor setting a couple of commands that we will use to interact with it. Use the following format for sending the list of commands:command1 - Description command2 - Another descriptionGo ahead and add the following:
gallery - Create a new photogallery
galleries - List all photogalleries and upload a new photo
cancel - Abort the current operation
These are the commands that our bot will understand and react to.
Finally you can start chatting with your bot, however you will not see any reply. Let’s take care of that by building our bot server running on ProcessWire.
Let’s code
Every time you message a bot, it forwards your message in the form of an API call to a server. This server is responsible for processing and responding to all the messages you send to the bot.
There are two ways we can go about receiving updates whenever someone sends messages to our bot :
- Long polling: periodically scan for any messages that may have appeared.
- Webhooks: have the bot call an API whenever it receives a message. Much faster and more responsive.
We are going to go with webhooks for this tutorial. Each webhook is called with an update object by the Telegram infrastructure.
Warning: Be aware that you need a valid SSL certificate for webhooks to work. You can use also use a self-signed certificate. For development purposes you can checkout Ngrok, a tool that will let you create secure tunnels to your localhost server.
First of all, take the API token of your bot and save inside the PW configuration file. Not everyone knows that you can add any of your own configuration options to your /site/config.php file and they will be available in the $config API variable to all of your templates.
<?php

// ...

/**
 * Telegram Token
 */
$config->telegramToken = "<your token>";
Set up the API template
Open up the /site/templates/api.php file and insert the code that includes our API routes. We will use PHPRoute to route the incoming requests to different Controllers, implementing a nice MVC pattern. Symfony or Laravel developers will definitely feel at home.
Notice:
This passage is not required. You can also handle the /api requests directly in your template file using ProcessWire, without using a separate router and the Symfony HTTP Foundation package. Nonetheless this approach is much more powerful and clean.
Put the following code inside the api.php file:
<?php
namespace ProcessWire;

require "{$config->paths->templates}api/routes.php";
Here we include our routes.php file, that defines all the API routes. The file it doesn’t exists yet, so we need to create it inside the /site/templates/api folder:
<?php

use function ProcessWire\wire;

use Phroute\Phroute\RouteCollector;
use Symfony\Component\HttpFoundation\Response;

$router = new RouteCollector();

// Simple filter for checking if the user is authenticated.
// Here it uses the session driver provided by PW, therefore is
// not suitable for a stateless API. Nonetheless you can modify it
// as you want, implementing JWT tokens, for example.
$router->filter('auth', function()
{
    if (! wire('user')->isLoggedin()) {
        return new Response("Unauthorized", Response::HTTP_UNAUTHORIZED, array('content-type' => 'application/json'));
    }
});

// Here you can add a few APIs for dealing with galleries from the frontend of your site
// These routes are not covered by this tutorial, but are here just to get you the idea.
$router->group(['before' => 'auth', 'prefix' => 'api/galleries'], function ($router)
{
    $router->get('/',            ['Api\Controllers\GalleryController', 'index']);
    $router->get('/{id:\d+}',    ['Api\Controllers\GalleryController', 'show']);
    $router->post('/{id:\d+}',   ['Api\Controllers\GalleryController', 'upload']);
});

// Finally this is the entry point of the Telegram webhook
$router->group(['prefix' => 'api'], function ($router)
{
    // Telegram will issue a POST request to your "/api/{token}" url,
    // where {token} is your API token
    $router->post('/{token}', ['Api\Controllers\BotController', 'index']);
});

$dispatcher = new Phroute\Phroute\Dispatcher($router->getData());

$response = $dispatcher->dispatch($_SERVER['REQUEST_METHOD'], parse_url($_SERVER['REQUEST_URI'], PHP_URL_PATH));

// Print out the value returned from the dispatched function
$response->send();
The code is really straightforward, however there’s a little problem here. If you check the Telegram documentation you will find the following paragraph that deals with authentication:
How can I make sure that Webhook requests are coming from Telegram? If you‘d like to make sure that the Webhook request comes from Telegram, we recommend using a secret path in the URL you give us, e.g. www.example.com/your_token. Since nobody else knows your bot’s token, you can be pretty sure it’s us.
Unfortunately the API token contains a colon charachter : which is cleaned by ProcessWire and, instead of routing the request to the api template, it throws a 404 error. Therefore we need to make sure that the webhook provided to Telegram doesn’t inlcude the colon character.
Set the Telegram webhook
To set the webhook that Telegram is going to call, you need to make a request to the setWebhook endpoint, passing your webhook url, as reported by the official documentation. If you are developing this locally, you can use the public HTTPS url provided by Ngrok as host. Otherwise just use your public URL.
Here you can find the code for a little Python snippet that does the job, but you can use whatever tool you want. Even cURL or Postman.
from pprint import pprint
import requests

bot_token = '<your token>'
test_url = "https://<your url>/{}".format('/api/<your token without column character>')

def get_url(method):
    return "https://api.telegram.org/bot{}/{}".format(bot_token,method)

r = requests.get(get_url("setWebhook"), data={"url": test_url})
r = requests.get(get_url("getWebhookInfo"))
pprint(r.status_code)
pprint(r.json())
Add the Bot Controller
Now it’s time to create the Controller that will handle the incoming request. Add a new Controllers folder inside /site/templates/api and create two new files inside it:
ApiController.phpwill be our base controller, which will be extended by every other controller that deals with the/apiendpointBotController.phpthe Controller that will actually handle the webhook request
<?php

namespace Api\Controllers;

use Symfony\Component\HttpFoundation\Request;

class ApiController
{
    protected $request;

    public function __construct()
    {
        $this->request = Request::createFromGlobals();
    }
}
As you can see, the only task of this parent Controller is to populate the $request instance variable with an object-oriented layer from PHP global variables ($_GET, $_POST, $_FILES, ecc.), using Symfony HTTP Foundation package. This passage is not strictly required, because Botman is smart enough to handle the request on its own, however I find this approach extremely clean when building APIs with ProcessWire, so I decided to include it in this tutorial.
Now we can add the skeleton of our BotController:
<?php

namespace Api\Controllers;

use function ProcessWire\wire;

use Symfony\Component\HttpFoundation\Response;

class BotController extends ApiController
{
    public function __construct()
    {
        parent::__construct();
    }

    public function index()
    {

    }
}
Before writing the actual implementation, you should inform composer that you have the Api namespace, therefore your files should be autoloaded following the PSR-4 convention. Open you composer.json file and add the namespace in the autoload section:
    "autoload": {
        "files": [ "wire/core/ProcessWire.php" ],
        "psr-4": {
            "Api\\": "site/templates/api/"
        }
    }
Finally point your terminal to the root of your site and execute the composer dump-autoload command.
Provide the Bot logic
BotMan is the most popular PHP chatbot framework in the world, written by Marcel Pociot, a well-known personality inside the Laravel community. Nevertheless BotMan is framework agnostic, therefore you can safely use it in your existing codebase.
After installing it, as well as the Telegram Driver, you can write the logic to initialize BotMan directly inside the constructor of our controller, as described by the documentation:
<?php
use BotMan\BotMan\BotMan;
use BotMan\BotMan\BotManFactory;
use BotMan\BotMan\Drivers\DriverManager;
use Symfony\Component\HttpFoundation\Response;
class BotController extends ApiController
{
public function __construct()
{
parent::__construct();
$config = [
"telegram" => [
// get the token from the configuration file
"token" => wire("config")->telegramToken
]
];
// Load the driver(s) you want to use
DriverManager::loadDriver(\BotMan\Drivers\Telegram\TelegramDriver::class);
$botman = BotManFactory::create($config);
// Give the bot something to listen for. When the user
// writes "hello", the bot should reply.
$botman->hears('hello', function (BotMan $bot) {
$bot->reply('Do you want to talk with ProcessWire?');
});
// Start listening
$botman->listen();
}
// we can use directly the constructor to handle Bot's logic, it feels cleaner to me,
// however nothing stops you to put the logic inside this method.
public function index()
{
// Log the Telegram request in a custom log file only if the site is in debug mode
if(wire("config")->debug) {
wire("log")->save("telegram", $this->request);
}
return new Response("ok", Response::HTTP_OK, array('content-type' => 'application/json'));
}
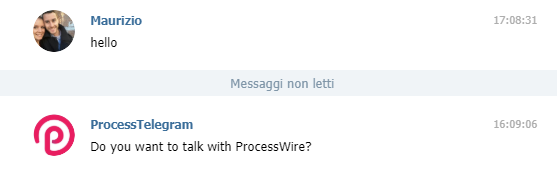
}You can know try to talk with your new Bot, open Telegram on your phone or on the Telegram Web platform and write “hello”. You should see the bot’s reply.
If everything works correctly you can go ahead and implement the actual conversation logic.
Create the first conversation
Conversations are actually a full exchange of information between you and your bot, therefore we need a mechanism to store the conversation logic, otherwise it will just disappear between a message and the other.
Warning: If you want to make use of BotMans Conversation feature, you need to use a persistent cache driver, where BotMan can store and retrieve the conversations. If not specified otherwise, BotMan will use the array cache which is non-persistent (stateless).
We are going to use the Symfony Cache package, however you can use whatever Cache adapter you want (even Redis), as long as it is PSR-6 compliant. Unfortunately ProcessWire cache doesn’t work in this case.
Edit the code in the controller and add the new code:
<?php

use BotMan\BotMan\BotMan;
use BotMan\BotMan\BotManFactory;
use BotMan\BotMan\Cache\Psr6Cache;
use BotMan\BotMan\Drivers\DriverManager;

use Symfony\Component\Cache\Adapter\FilesystemAdapter;
use Symfony\Component\HttpFoundation\Response;

class BotController extends ApiController
{
    public function __construct()
    {
        parent::__construct();

        // ...

        // create the filesystem cache adapter
        $adapter = new FilesystemAdapter();

        // create a new instance of the Bot, leveraging the Cache
        $botman = BotManFactory::create($config, new Psr6Cache($adapter));

        $botman->hears('hello', function (BotMan $bot) {
            $bot->reply('Do you want to talk with ProcessWire?');
        });

        // add a fallback response, in case the bot doesn't understand an instruction
        $botman->fallback(function($bot) {
            $bot->reply('Sorry, I did not understand these commands.');
        });

        // Start listening
        $botman->listen();
    }

    // ...
}
Wonderful! Now we need to add our conversations. Remember the commands that we gave Telegram before? We are going to implement the logic for those commands.
Create a new folder Conversations in /site/templates/api and create a new PHP file called GalleryCreateConversation. All conversations that your bot might use need to extend the abstract Conversation class and implement a run method, which represents the starting point of your conversation and get’s executed immediately.
<?php
namespace Api\Conversations;
use function ProcessWire\wire;
use Exception;
use BotMan\BotMan\Messages\Conversations\Conversation;
use BotMan\BotMan\Messages\Incoming\Answer;
use BotMan\BotMan\Messages\Incoming\IncomingMessage;
use BotMan\BotMan\Messages\Outgoing\Question;
use BotMan\BotMan\Messages\Outgoing\Actions\Button;
use ProcessWire\Page;
class GalleryCreateConversation extends Conversation
{
protected $gallery_id;
protected $gallery_name;
public function askGallery()
{
wire("log")->save("telegram", "askGallery");
$this->ask("Hello! So you want to create a new Gallery. What name do you want for it?", function(Answer $answer) {
$gallery = new Page();
$gallery->template = "gallery";
$gallery->parent = wire("pages")->get('/galleries');
$gallery->title = $answer->getText();
$gallery->addStatus(Page::statusUnpublished);
$gallery->save();
$this->gallery_id = $gallery->id;
$this->say("Awesome! Your gallery has been created with id " . $gallery->id);
$this->askPublish();
});
}
public function askPublish()
{
wire("log")->save("telegram", "askPublish");
$this->ask('One more thing - do you want to publish the new gallery? YES or NO', [
[
'pattern' => 'yes|yep',
'callback' => function () {
$gallery = wire("pages")->get($this->gallery_id);
if (! $gallery->id) {
$this->say("The gallery does not exists");
return;
}
$gallery->removeStatus(Page::statusUnpublished);
$gallery->save();
$this->say("Your gallery has been published! You can upload photos using the /galleries command.");
}
],
[
'pattern' => 'no|nope',
'callback' => function () {
$this->say("As you command, my king (cit.)!");
}
]
]);
}
public function run()
{
$this->askGallery();
}
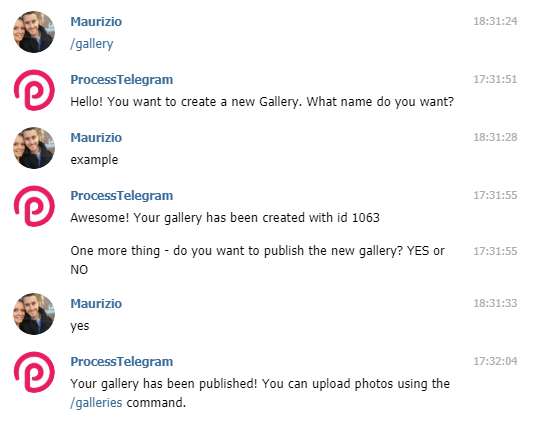
}As you can see the code is really straightforward. The first function that gets triggered is askGallery: the bot asks for a name for the new gallery and as soon as it receives an answer, it creates a new PW page with the gallery template and attaches it to the required parent page. Before saving the new page it adds the “Unpublished” state, so it will not be immediately visible on the frontend.
The the bot then moves to the askPublish function, where it asks if the page should now be published. Notice that we have used a few protected instance variables ($gallery_id and $gallery_name to keep track of the conversation between each method).
In this function we will ask if the user wants to publish the newely generated gallery. The bot can accept a few different values for positive (yes or yep) and negative (no or nope) responses, and it will act accordingly, executing the callback function. Every other value is catched by our fallback instruction.
The last step is to inform the bot that we have a new conversation class for the /gallery command. Open the BotController class and add the following code:
<?php

// ...

$botman->hears('/gallery', function($bot) {
    $bot->startConversation(new GalleryCreateConversation);
});
And finally we can test it.
Create the file upload conversation
Now we can move on and create the conversation for actually uploading new files. With BotMan is really easy to receive images, videos, audio files or locations: the Telegram driver supports all of them.
Go ahead and create a new conversation class and call it GalleryUploadConversation.
<?php
namespace Api\Conversations;
use function ProcessWire\wire;
use Exception;
use BotMan\BotMan\Messages\Conversations\Conversation;
use BotMan\BotMan\Messages\Incoming\Answer;
use BotMan\BotMan\Messages\Incoming\IncomingMessage;
use BotMan\BotMan\Messages\Attachments\Image;
use BotMan\BotMan\Messages\Outgoing\Question;
use BotMan\BotMan\Messages\Outgoing\Actions\Button;
class GalleryUploadConversation extends Conversation
{
protected $gallery_id;
public function askGallery()
{
try {
$pages = wire("pages")->find('template=gallery');
$buttons = [];
foreach($pages as $page) {
$buttons[] = Button::create($page->title)->value($page->id);
}
$question = Question::create('Please choose a gallery.')
->fallback('The selected gallery is not valid')
->callbackId('choose_gallery')
->addButtons($buttons);
$this->ask($question, function (Answer $answer) {
if ($answer->isInteractiveMessageReply()) {
$this->gallery_id = $answer->getValue();
$this->say('Wonderful! The selected gallery is: '. $answer->getText());
$this->askPhoto();
}
});
} catch (Exception $e) {
wire("log")->error("telegram", $e->getMessage());
}
}
public function askPhoto()
{
wire("log")->save("telegram", "askPhoto for {$this->gallery_id}");
$this->askForImages('Please upload an image.', function ($images) {
$gallery = wire("pages")->findOne("id={$this->gallery_id}");
if (! $gallery) {
$this->reply('The gallery does not exists: '. $this->gallery_id);
return;
}
$gallery->of(false);
foreach ($images as $image) {
wire("log")->save("telegram", $image->getUrl());
$gallery->images->add($image->getUrl());
// $url = $image->getUrl(); // The direct url
// $title = $image->getTitle(); // The title, if available
// $payload = $image->getPayload(); // The original payload
}
$gallery->save();
wire("log")->save("telegram", "Operation completed!");
$this->say('Operation completed! You can now upload another photo. Otherwise just use the command /cancel to abort this conversation!');
$this->askPhoto();
}, function(Answer $answer) {
$this->say('This is not a valid image');
});
}
public function run()
{
$this->askGallery();
}
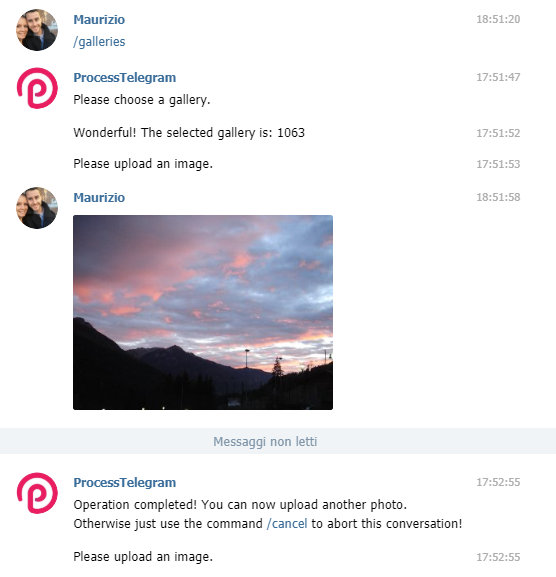
}The first function that gets executed is askGallery. It retrieves all the pages with the gallery template and sends all the titles and ids to the user, using the Inline Keyboard Button interface. Using this special response the user can answer to the bot just by tapping a button from a predefined set of values, without actually writing anything. You can see it in action in the following image:

As soon as the bot receives the gallery id provided by the user, it moves to the askPhoto function. You can now take a picture directly within the app and it will be immediately uploaded to the Telegram infrastructure, where it will be available from a specific url (something like https://api.telegram.org/file/bot<your token>/photos/file_1.jpg). From there the bot will take the image and attach it to the gallery selected in the previous step. You can keep uploading images and they will all be attached the your gallery.
Notice: In Telegram the maximum file size to download is 20 MB.
Finally open the BotController class and add the TelegramPhotoDriver, which is required for dealing with images. Also add the following code to inform the bot that a new conversation command exists:
<?php
// Load the TelegramPhotoDriver
DriverManager::loadDriver(\BotMan\Drivers\Telegram\TelegramPhotoDriver::class);
// Add the conversation
$botman->hears('/galleries', function($bot) {
$bot->startConversation(new GalleryUploadConversation);
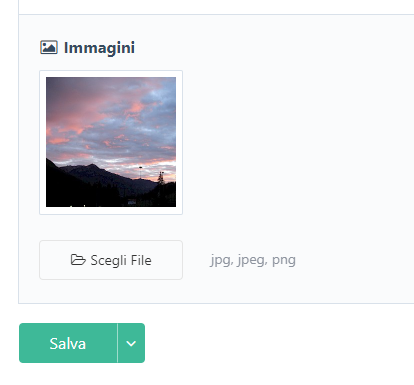
});Now you can test the command. If everything works correctly you will see your image inside the administration panel and on the frontend of your site.
We are nearly there! The last step is to add a new command for the user to ensure a safe way to abort conversations, for whatever reason. You can use Botman’ stopsConversation method which clears the entire conversation and sets a clean state. You just need to add the required code to the BotController for reacting to the /cancel command:
<?php

$botman->hears('/cancel', function(BotMan $bot) {
    $bot->reply('Abort!');
})->stopsConversation();
We are finally arrived at the end of this tutorial! You can use this interface to interact with pretty much all the ProcessWire APIs. As Ryan always writes: “the sky is the limit”.
Go ahead and if build something interesting please share with me.